Skip to content
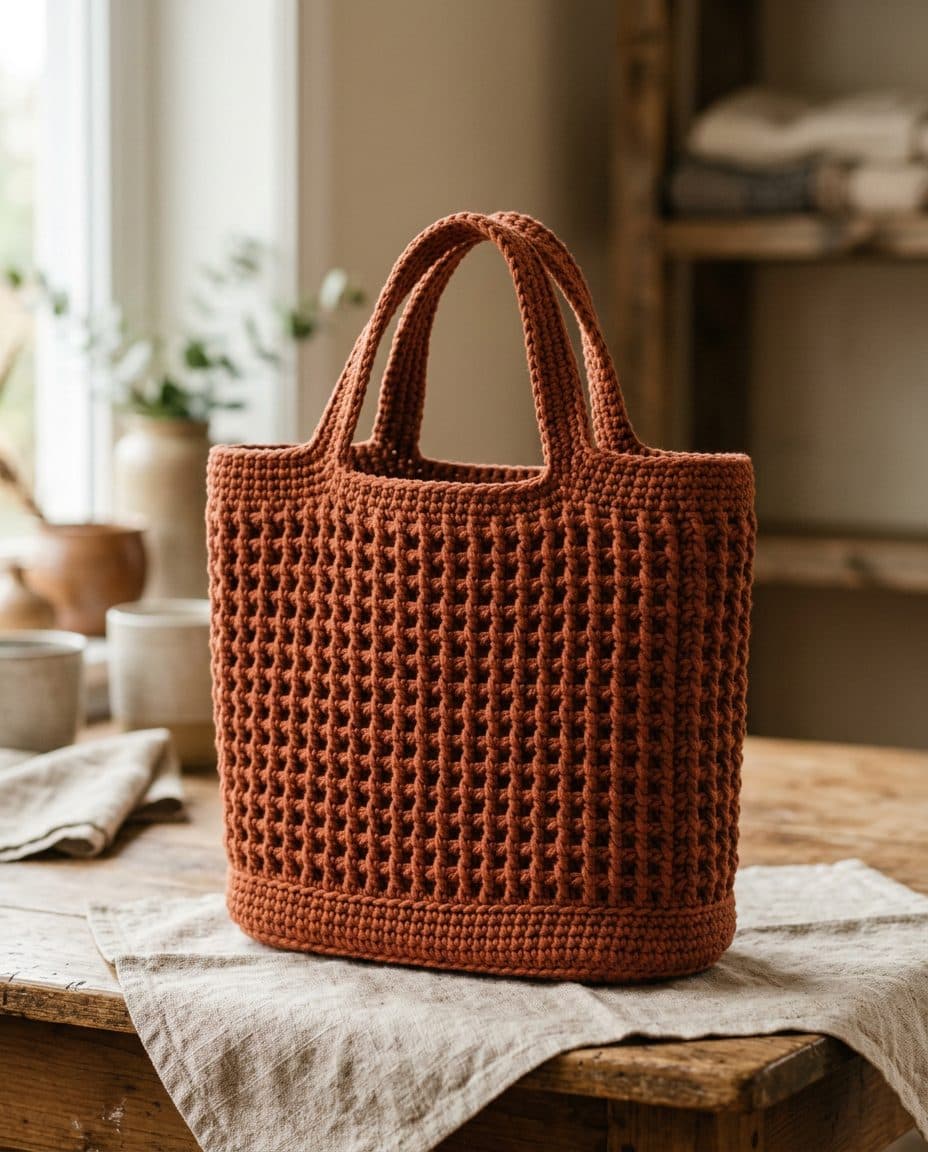
Harvest Tote, preview render
Preview render

Free crochet pattern · intermediate · bulky weight

Harvest Tote

A structured crochet tote worked in thermal stitch from a flat oval base upward in the round, creating a dense, stand-alone bag with reinforced handles. Perfect for market trips or everyday carry.

Stands up on its own

Finished / weight

Approximately 13 in wide × 10 in tall × 5 in deep (unstretched, after blocking)

Gauge

10 sts × 10 rows = 4 in (10 cm) in thermal stitch with K-10.5 (6.5 mm) hook

Yarn

Bulky weight, 350 yards total. Recycled cotton or cotton-blend bulky recommended for structure (e.g., Lion Brand Re-Up or similar).

Needles / hooks

K-10.5 (6.5 mm) crochet hook

Notions

Stitch markers (4), tapestry needle, scissors, measuring tape

Abbreviations

ch = chainsc = single crochetsc2tog = single crochet 2 stitches together (decrease)sl st = slip stitchst = stitchsts = stitchessp = spaceRS = right sideWS = wrong sidepm = place markersm = slip markerBLO = back loop onlyFLO = front loop onlyrnd = roundrep = repeatthsc = thermal stitch single crochet: insert hook into the front vertical bar of the stitch two rows below, draw up a loop, complete as scinc = increase: work 2 sc into the same stitchbeg = beginningcont = continue

Thermal Stitch Note

Pattern NoteThermal stitch is worked over 2 alternating rounds. Round A (foundation round): sc in BLO across all sts. Round B (thermal round): thsc across all sts — insert hook into the front vertical bar of the sc from 2 rounds below (the bar that faces you on the outside of the fabric), pull up a loop to the height of the current round, complete as sc. The thsc elongates to meet the current row height and creates the dense, quilted thermal texture. On the oval base, work both round types as described but shaping increases are always worked as regular sc (not thsc) at the marked corner positions.

Flat Oval Base

Foundation ChainCh 19. The base chain forms the long spine of the oval.
Rnd 1Beg in 2nd ch from hook, sc in each of next 17 ch, 3 sc in last ch (corner); working along opposite side of foundation ch, sc in each of next 17 ch, 3 sc in first ch (corner); sl st to first sc to join rnd. Do not turn. pm in center st of each 3-sc corner group (4 markers total, 2 at each short end). (40 sts)40 sts
Rnd 2Ch 1, sc in BLO of each st around, working inc (2 sc in same st) in each marked corner center st (4 inc total); sl st to first sc to join. Move markers to new center corner sts. (44 sts)44 sts
Rnd 3Ch 1, thsc in each st around, working inc (2 regular sc) in each marked corner center st (4 inc total); sl st to first sc to join. Move markers to new center corner sts. (48 sts)48 sts
Rnd 4Ch 1, sc in BLO of each st around, working inc in each marked corner center st (4 inc total); sl st to first sc to join. Move markers to new center corner sts. (52 sts)52 sts
Rnd 5Ch 1, thsc in each st around, working inc in each marked corner center st (4 inc total); sl st to first sc to join. Move markers to new center corner sts. (56 sts)56 sts
Rnd 6Ch 1, sc in BLO of each st around, working inc in each marked corner center st (4 inc total); sl st to first sc to join. Move markers to new center corner sts. (60 sts)60 sts
Rnd 7Ch 1, thsc in each st around, working inc in each marked corner center st (4 inc total); sl st to first sc to join. Move markers to new center corner sts. (64 sts)64 sts

Body

Rnd 8Ch 1, sc in BLO of each st around (no increases); sl st to first sc to join. (64 sts)
Rnd 9Ch 1, thsc in each st around; sl st to first sc to join. (64 sts)
Rnd 10Ch 1, sc in BLO of each st around; sl st to first sc to join. (64 sts)
Rnd 11Ch 1, thsc in each st around; sl st to first sc to join. (64 sts)
Rnd 12Ch 1, sc in BLO of each st around; sl st to first sc to join. (64 sts)
Rnd 13Ch 1, thsc in each st around; sl st to first sc to join. (64 sts)
Rnd 14Ch 1, sc in BLO of each st around; sl st to first sc to join. (64 sts)
Rnd 15Ch 1, thsc in each st around; sl st to first sc to join. (64 sts)
Rnd 16Ch 1, sc in BLO of each st around; sl st to first sc to join. (64 sts)
Rnd 17Ch 1, thsc in each st around; sl st to first sc to join. (64 sts)
Rnd 18Ch 1, sc in BLO of each st around; sl st to first sc to join. (64 sts)
Rnd 19Ch 1, thsc in each st around; sl st to first sc to join. (64 sts)
Rnd 20Ch 1, sc in BLO of each st around; sl st to first sc to join. (64 sts)
Rnd 21Ch 1, thsc in each st around; sl st to first sc to join. (64 sts)
Rnd 22Ch 1, sc in BLO of each st around; sl st to first sc to join. (64 sts)
Rnd 23Ch 1, thsc in each st around; sl st to first sc to join. (64 sts)
Rnd 24Ch 1, sc in BLO of each st around; sl st to first sc to join. (64 sts)
Rnd 25Ch 1, thsc in each st around; sl st to first sc to join. (64 sts)

Top Edging and Handle Openings

Rnd 26Ch 1, sc in each st around (through both loops, no BLO); sl st to first sc to join. This stabilizes the top edge. (64 sts)
Rnd 27 (Handle Opening Round)Ch 1, sc in first 10 sts, ch 14 (first handle chain), skip 12 sts, sc in next 20 sts, ch 14 (second handle chain), skip 12 sts, sc in last 10 sts; sl st to first sc to join. (40 sc + 2 ch-14 sps, equivalent to 68 sts in the round)68 sts
Rnd 28Ch 1, sc in each of next 10 sc, sc in each of 14 ch across first handle sp, sc in each of next 20 sc, sc in each of 14 ch across second handle sp, sc in each of last 10 sc; sl st to first sc to join. (68 sts)68 sts
Rnd 29Ch 1, sc in each st around; sl st to first sc to join. (68 sts)

Handle Reinforcement

Handle 1, Row 1 (RS, worked flat)With RS facing, join yarn at beg of first ch-14 handle section from Rnd 27. Ch 1, sc in each of 14 sts across handle; turn. Do not join. (14 sts)14 sts
Handle 1, Row 2 (WS)Ch 1, sc in BLO of each of 14 sts across; turn. (14 sts)
Handle 1, Row 3 (RS)Ch 1, sc in each of 14 sts across; turn. (14 sts)
Handle 1, Row 4 (WS)Ch 1, sc in BLO of each of 14 sts across; turn. (14 sts)
Handle 1, Row 5 (RS)Ch 1, sc in each of 14 sts across. Fasten off leaving a 12-in tail for seaming. (14 sts)
Handle 1 AssemblyFold the 5-row handle strip over itself so it meets the inside of the bag at the handle opening. Using tapestry needle and tail, whipstitch the last row of the handle strip to the corresponding sts on the inside of Rnd 27 to form a double-thick reinforced handle tube. Weave in end securely.
Handle 2, Row 1 (RS, worked flat)With RS facing, join yarn at beg of second ch-14 handle section from Rnd 27. Ch 1, sc in each of 14 sts across handle; turn. (14 sts)14 sts
Handle 2, Row 2 (WS)Ch 1, sc in BLO of each of 14 sts across; turn. (14 sts)
Handle 2, Row 3 (RS)Ch 1, sc in each of 14 sts across; turn. (14 sts)
Handle 2, Row 4 (WS)Ch 1, sc in BLO of each of 14 sts across; turn. (14 sts)
Handle 2, Row 5 (RS)Ch 1, sc in each of 14 sts across. Fasten off leaving a 12-in tail for seaming. (14 sts)
Handle 2 AssemblyFold the 5-row handle strip over itself so it meets the inside of the bag at the handle opening. Using tapestry needle and tail, whipstitch the last row of the handle strip to the corresponding sts on the inside of Rnd 27 to form a double-thick reinforced handle tube. Weave in end securely.

Finishing

Weave in all remaining ends securely with a tapestry needle, especially at the base join and handle attachments. Block the tote lightly by dampening with cool water, shaping to dimensions (13 in wide × 10 in tall × 5 in deep), and allowing to dry flat or over a box to hold shape. The dense thermal stitch and cotton fiber will hold their structure well after blocking. Optionally, add a fabric liner sewn to the inside top edge for extra structure and to prevent items from slipping through the fabric.

Notes

Thermal stitch is inherently slow to work because each thsc row requires inserting the hook two rows below — take your time and maintain consistent tension. Recycled cotton is ideal: it has zero stretch, giving the tote its stand-alone structure. If your gauge is slightly off, adjust hook size up (7 mm) for looser tension or down (6 mm) for tighter. The finished handle opening is approximately 5 in wide × 2 in tall and can be widened by adding extra chain sts in Rnd 27 (each 2 extra ch = approximately 0.8 in extra width). For a deeper bag, simply continue the body pattern (alternating BLO sc and thsc rounds) before working the top edging section. Stitch markers at the corners of the oval base are essential — do not skip them or your shaping will skew.

Knit this row by row — free

SkeinSmart keeps your place in any pattern, syncs across devices, and turns your yarn stash into a shopping list. Describe a project and get your own pattern in seconds.

Start tracking this pattern →

AI-drafted, human-run · this version drafted Oct 4, 2026. Always swatch and verify stitch counts before casting on.