Skip to content
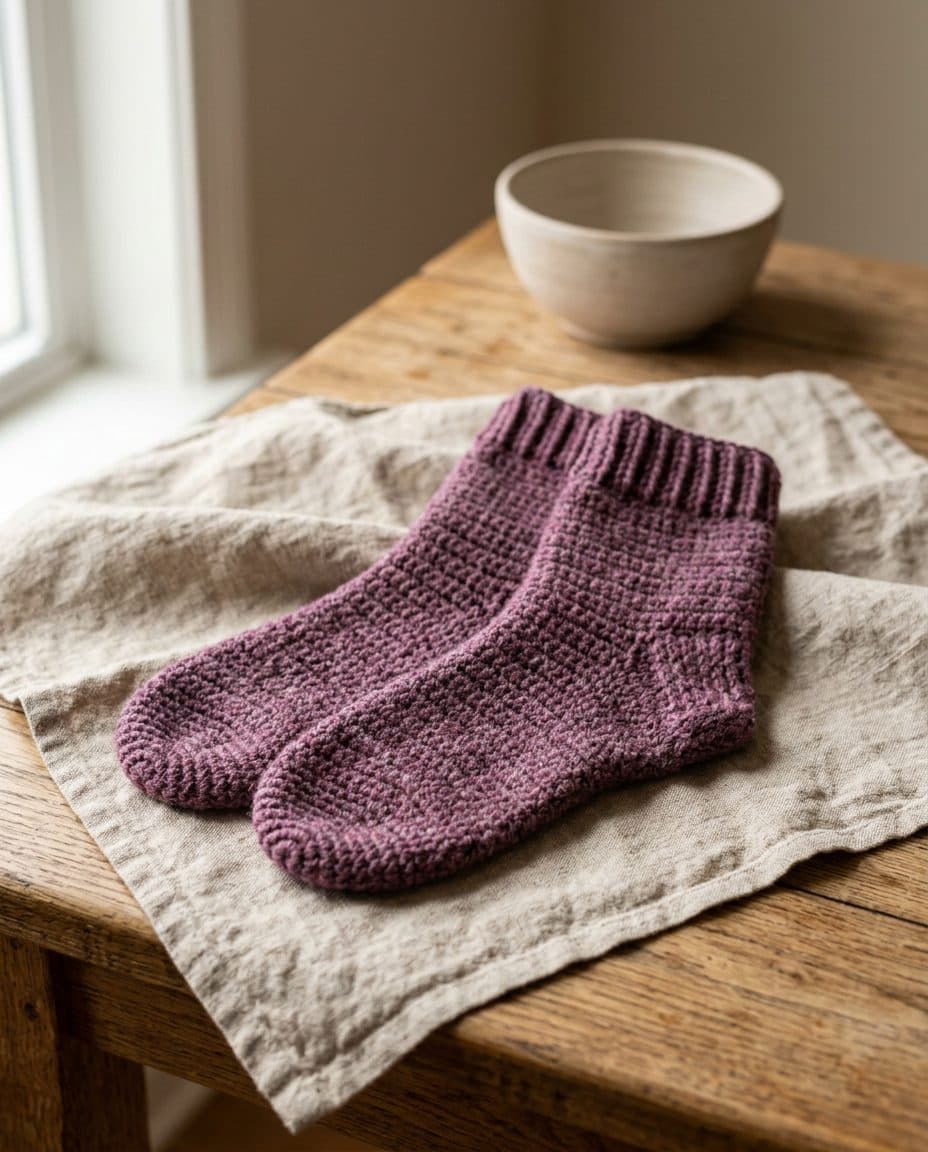
Alpine Meadow Socks, preview render
Preview render

Free crochet pattern · advanced · fingering weight

Alpine Meadow Socks

Toe-up crochet socks worked in the round in extended single crochet with a front-post ribbing cuff and an afterthought heel inserted after the foot is complete. Sized for an average adult foot (approximately 8–8.5 in foot circumference).

For the sock-curious

Finished / weight

7.5 in foot circumference (unstretched) × 9 in foot length (adjustable) × 7 in leg length

Gauge

24 sts × 26 rows = 4 in (10 cm) in extended single crochet with C-2 (2.75 mm) hook, blocked

Yarn

Fingering weight, 400–460 yards per pair (200–230 yards per sock), superwash merino or wool-nylon blend recommended

Needles / hooks

US C-2 (2.75 mm) crochet hook

Notions

Stitch markers (4), tapestry needle, waste yarn in contrasting color (approximately 1 yard), scissors

Abbreviations

ch = chainsl st = slip stitchsc = single crochetesc = extended single crochet: insert hook, pull up loop, pull through first loop on hook, pull through both loops2 esc in next = work 2 extended single crochet into the same stitch (increase)esc2tog = extended single crochet 2 together (decrease): [insert hook in next st, pull up loop, pull through first loop] twice, pull through all 3 loops on hookfpdc = front post double crochet: yo, insert hook from front to back to front around post of indicated stitch, pull up loop, [yo, pull through 2 loops] twicebpdc = back post double crochet: yo, insert hook from back to front to back around post of indicated stitch, pull up loop, [yo, pull through 2 loops] twicepm = place markersm = slip markerRS = right sideWS = wrong sidest = stitchsts = stitchesrnd = roundrep = repeatBLO = back loop onlyapprox = approximately

Notes Before You Begin

Note 1Socks are worked as a pair, one at a time, toe-up in the round. The heel stitches are worked over waste yarn during the foot; the waste yarn is removed later and the heel is worked into the live loops that remain.
Note 2To work in the round in crochet, each round begins with a ch 1 (does not count as a stitch) and ends with a sl st into the first esc of the round to close. The ch 1 turning chain is NOT counted in the stitch total.
Note 3Place a stitch marker in the first stitch of each round to track round beginnings. Move the marker up as work progresses.
Note 4Stitch counts given are total sts in the round after closing sl st, not including turning chains.

Toe

SetupUsing the magic ring method, ch 2. Work 8 esc into the ring. Do not close ring yet. Pm in first esc. Pull ring closed. (8 sts)8 sts
Rnd 1Ch 1, 2 esc in each st around, sl st to first esc to join. (16 sts)16 sts
Rnd 2Ch 1, [2 esc in next st, esc in next st] 8 times, sl st to first esc to join. (24 sts)24 sts
Rnd 3Ch 1, [2 esc in next st, esc in next 2 sts] 8 times, sl st to first esc to join. (32 sts)32 sts
Rnd 4Ch 1, [2 esc in next st, esc in next 3 sts] 8 times, sl st to first esc to join. (40 sts)40 sts
Rnd 5Ch 1, [2 esc in next st, esc in next 4 sts] 8 times, sl st to first esc to join. (48 sts)48 sts

Foot

Rnds 6–23Ch 1, esc in each of the 48 sts around, sl st to first esc to join. (48 sts)(18 rows)
Rnd 24 — Waste Yarn Heel RowCh 1, with waste yarn: esc in each of the next 24 sts (this marks the heel position across the sole); drop waste yarn. With working yarn, continue: esc in each of the remaining 24 sts, sl st to first esc of round to join. (48 sts) Note: The 24 waste-yarn sts will be removed later to open the heel.48 sts
Rnds 25–33Ch 1, esc in each of the 48 sts around, sl st to first esc to join. (48 sts)(9 rows)
Rnd 34Ch 1, esc in each of the 48 sts around, sl st to first esc to join. Continue foot in esc until piece measures approx 2 in less than desired total foot length from toe. (48 sts)

Ankle Transition

Rnd 35Ch 1, esc in each of the 48 sts around, sl st to first esc to join. (48 sts) — Foot is now complete; ankle begins.
Rnds 36–40Ch 1, esc in each of the 48 sts around, sl st to first esc to join. (48 sts)(5 rows)

Leg — Cuff in Front Post Ribbing

Rnd 41 — Ribbing SetupCh 2 (does not count as st), [fpdc around next st, bpdc around next st] 24 times, sl st to first fpdc to join. (48 sts)48 sts
Rnds 42–57Ch 2, [fpdc around next fpdc, bpdc around next bpdc] 24 times, sl st to first fpdc to join. (48 sts)(16 rows)
Rnd 58 — Cuff Bind-OffCh 1, sc in BLO of each st around (48 sc), sl st to first sc. Fasten off, leaving a 6-in tail.48 sts

Afterthought Heel

Heel SetupCarefully remove waste yarn from Rnd 24, exposing 24 live loops along the bottom edge and 24 live loops along the top edge of the heel opening (48 total live loops). Join working yarn with a sl st at the right side of the heel opening.48 sts
Heel Rnd 1Ch 1, work 24 esc across the bottom loops of the heel opening, then 24 esc across the top loops of the heel opening, sl st to first esc to join. (48 sts)48 sts
Heel Rnd 2Ch 1, esc2tog over first 2 sts, esc in next 20 sts, esc2tog over next 2 sts, esc2tog over next 2 sts, esc in next 20 sts, esc2tog over next 2 sts, sl st to first esc to join. (44 sts)44 sts
Heel Rnd 3Ch 1, esc2tog over first 2 sts, esc in next 18 sts, esc2tog over next 2 sts, esc2tog over next 2 sts, esc in next 18 sts, esc2tog over next 2 sts, sl st to first esc to join. (40 sts)40 sts
Heel Rnd 4Ch 1, esc2tog over first 2 sts, esc in next 16 sts, esc2tog over next 2 sts, esc2tog over next 2 sts, esc in next 16 sts, esc2tog over next 2 sts, sl st to first esc to join. (36 sts)36 sts
Heel Rnd 5Ch 1, esc2tog over first 2 sts, esc in next 14 sts, esc2tog over next 2 sts, esc2tog over next 2 sts, esc in next 14 sts, esc2tog over next 2 sts, sl st to first esc to join. (32 sts)32 sts
Heel Rnd 6Ch 1, esc2tog over first 2 sts, esc in next 12 sts, esc2tog over next 2 sts, esc2tog over next 2 sts, esc in next 12 sts, esc2tog over next 2 sts, sl st to first esc to join. (28 sts)28 sts
Heel Rnd 7Ch 1, esc2tog over first 2 sts, esc in next 10 sts, esc2tog over next 2 sts, esc2tog over next 2 sts, esc in next 10 sts, esc2tog over next 2 sts, sl st to first esc to join. (24 sts)24 sts
Heel Rnd 8Ch 1, esc2tog over first 2 sts, esc in next 8 sts, esc2tog over next 2 sts, esc2tog over next 2 sts, esc in next 8 sts, esc2tog over next 2 sts, sl st to first esc to join. (20 sts)20 sts
Heel Rnd 9Ch 1, esc2tog over first 2 sts, esc in next 6 sts, esc2tog over next 2 sts, esc2tog over next 2 sts, esc in next 6 sts, esc2tog over next 2 sts, sl st to first esc to join. (16 sts)16 sts
Heel Rnd 10Ch 1, esc2tog over first 2 sts, esc in next 4 sts, esc2tog over next 2 sts, esc2tog over next 2 sts, esc in next 4 sts, esc2tog over next 2 sts, sl st to first esc to join. (12 sts)12 sts
Heel Rnd 11Ch 1, esc2tog over first 2 sts, esc in next 2 sts, esc2tog over next 2 sts, esc2tog over next 2 sts, esc in next 2 sts, esc2tog over next 2 sts, sl st to first esc to join. (8 sts)8 sts
Heel CloseFasten off, leaving a 12-in tail. Thread tail onto tapestry needle and draw through all 8 remaining sts. Pull snug to close heel cup. Weave in end securely on the inside.

Finishing

Weave in all ends securely on the WS using a tapestry needle. Wet block both socks by soaking in cool water for 20 minutes, gently pressing out excess water in a towel, and laying flat or placing on sock blockers to dry. This opens up the esc fabric and helps the ribbing relax to its final dimensions. Make second sock the same way.

Notes

SIZING: This pattern is written for a foot circumference of approximately 7.5 in (unstretched), which fits a 8–8.5 in foot with negative ease typical of crochet socks. For a smaller foot (7–7.5 in circumference), work through Rnd 4 of the Toe (40 sts) and adjust all stitch counts accordingly. For a larger foot (9 in circumference), continue Toe increases through a Rnd 6 (56 sts). FOOT LENGTH: Rnds 6–34 are written as a guide; continue working even rnds until the foot is approximately 2 in shorter than your desired total foot length before transitioning to the ankle. Each round adds approximately 0.15 in of length. WASTE YARN HEEL: Use a smooth, slippery waste yarn (cotton or nylon) in a contrasting color so it is easy to remove. Work over exactly 24 sts — this is the sole half of the sock. When removing waste yarn, go slowly and place live loops onto a stitch holder or directly onto your hook before they unravel. RIBBING: The fpdc/bpdc ribbing creates a very stretchy fabric. Do not crochet tightly during this section — go up a hook size if your ribbing feels stiff. TURNING CHAINS: The ch 2 at the start of each ribbing round does NOT count as a stitch. Always work the first fpdc into the first actual fpdc post of the previous round. GAUGE: Check your gauge before starting. One stitch at this gauge equals approximately 1/6 inch, so gauge accuracy directly affects the fit of the sock.

Knit this row by row — free

SkeinSmart keeps your place in any pattern, syncs across devices, and turns your yarn stash into a shopping list. Describe a project and get your own pattern in seconds.

Start tracking this pattern →

AI-drafted, human-run · this version drafted Oct 6, 2026. Always swatch and verify stitch counts before casting on.